Long answer incoming - I hope it helps.
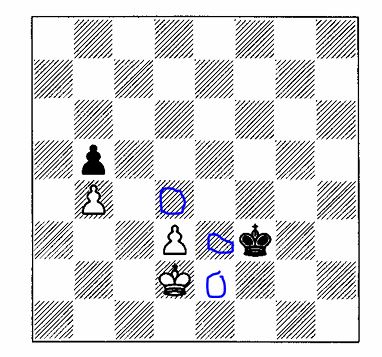
A critical square indicates a position on which if your king sat, you would win no matter which side was to play. You can derive them (in the black and white diagram) by working backwards from c5 - since if the white king sat on c5 there would be no defense of the b5 pawn no matter where the black king sat. You can then put your king on d5 and find you still win the b pawn no matter which color is to play, and also e5.
The 3 critical squares you have circled indicate places where if your king sat, there would be no defense to stop you from reaching one of the c5-d5-e5 trio, no matter which color is to play, and therefore from those squares you will always win the b pawn.
The most difficult position in the diagram would be with the white king on the critical e3 square and the black king on d5 with white to move since the position must be won with a pawn race instead of brute force to the c5-d5-e5 squares.
If the white king can not reach any of the 3 circled squares, he can be also kept from c5-d5-e5 and will not win the black b pawn.
Example 2 has the exact same situation - derived from the same trio of squares directly beside the black pawn, this time d3-e3-f3, and the three to the other side b3-a3 and if there were another file to the left of a, there would be a third critical square. Reaching the indicated critical squares will allow white to force his way to the pawn to win it no matter which side is to play.
Example 3 is more complicated to play out, since the critical square theory is compounded by the need for corresponding square theory to decide if the white king can force his way to the critical squares. The square d3 for example corresponds to g6 where if the white king sits on d3, the black king must move onto g6 or white will force his way to one of the critical squares.
Happy to elaborate if that isn't clear enough. If you have any other positions to show without giving the answer we can derive the critical squares on the thread.
Long answer incoming - I hope it helps.
A critical square indicates a position on which if your king sat, you would win no matter which side was to play. You can derive them (in the black and white diagram) by working backwards from c5 - since if the white king sat on c5 there would be no defense of the b5 pawn no matter where the black king sat. You can then put your king on d5 and find you still win the b pawn no matter which color is to play, and also e5.
The 3 critical squares you have circled indicate places where if your king sat, there would be no defense to stop you from reaching one of the c5-d5-e5 trio, no matter which color is to play, and therefore from those squares you will always win the b pawn.
The most difficult position in the diagram would be with the white king on the critical e3 square and the black king on d5 with white to move since the position must be won with a pawn race instead of brute force to the c5-d5-e5 squares.
If the white king can not reach any of the 3 circled squares, he can be also kept from c5-d5-e5 and will not win the black b pawn.
Example 2 has the exact same situation - derived from the same trio of squares directly beside the black pawn, this time d3-e3-f3, and the three to the other side b3-a3 and if there were another file to the left of a, there would be a third critical square. Reaching the indicated critical squares will allow white to force his way to the pawn to win it no matter which side is to play.
Example 3 is more complicated to play out, since the critical square theory is compounded by the need for corresponding square theory to decide if the white king can force his way to the critical squares. The square d3 for example corresponds to g6 where if the white king sits on d3, the black king must move onto g6 or white will force his way to one of the critical squares.
Happy to elaborate if that isn't clear enough. If you have any other positions to show without giving the answer we can derive the critical squares on the thread.